Blog
Pre-Send Email Campaign Checklist: 12 Crucial Steps Before Hitting Send
Master your email marketing pre-send QA with this crucial 12-step checklist. From SPF/DKIM to mobile rendering and list hygiene, ensure every campaign is

> TL;DR: Hitting "Send" on an email marketing campaign without a systematic pre-flight review invites broken links, rendering glitches, deliverability traps, and embarrassing typos. This 12-step pre send email checklist walks you through verifying sender authentication, preview text rendering, link tracking, list hygiene, dark mode layout, and fallback tags before launch.
An email campaign is one of the few digital marketing assets that cannot be edited or recalled after publication. Once a message leaves your mail transfer agent (MTA) and lands in subscriber inboxes, every broken URL, missing fallback tag, misconfigured suppression list, or design flaw is permanent. At Sendgrove, we understand that while landing pages, digital ads, and social media posts can be updated live within seconds of detecting an error, an email marketing mistake lives forever in thousands of recipient inboxes.
According to deliverability benchmarks across major Internet Service Providers (ISPs), over 22% of legitimate commercial emails fail to reach the primary inbox due to preventable technical misconfigurations—such as broken tracking domains, unverified authentication, or high bounce rates from stale contact lists. Running a rigorous email marketing pre send checklist acts as a final quality control gate, ensuring every message renders cleanly, passes spam filters, and drives maximum conversion.
Last updated: March 2026
Step 1: Verify Sender Domain Authentication (SPF, DKIM, and DMARC)
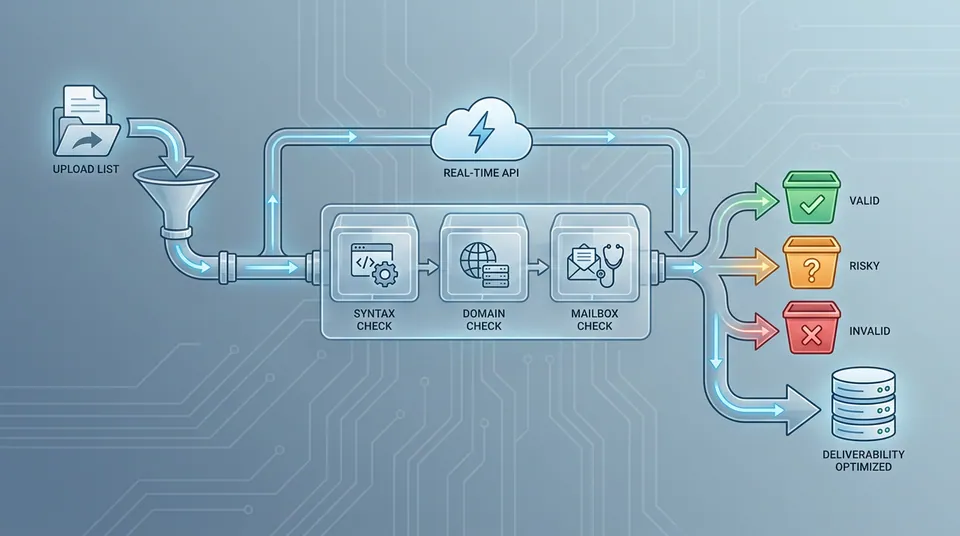
Before inspecting graphics, checking button padding, or proofreading body copy, confirm that your sending infrastructure is fully authenticated. Modern inbox providers—including Google, Yahoo, and Microsoft—strictly enforce domain authentication protocols for all commercial sends. Missing or misaligned records trigger aggressive spam filtering, rate-limiting throttling, or outright rejection at the incoming mail gateway.
The Authentication Pre-Flight Inspection
- SPF (Sender Policy Framework) Audit: Verify that the sending IP address of your mail service provider is explicitly listed in your domain's DNS
v=spf1TXT record. If you recently migrated ESPs or added dedicated sending IPs, ensure your SPF record includes the properinclude:mechanisms without exceeding the 10-DNS-lookup limit. An SPF record that requires more than 10 DNS lookups results in aPermError, causing receiving servers to treat SPF as unverified. - DKIM (DomainKeys Identified Mail) Signature Alignment: Confirm that your email headers carry a valid, active cryptographic signature matching your sending domain. Run a pre-send test send to inspect the raw email header and verify that DKIM alignment shows
passfor your custom domain rather than a shared default provider domain. Inspect the DKIM selector (e.g.,sg._domainkey.yourdomain.com) to ensure the public key matches the private key signing your messages. - DMARC (Domain-based Message Authentication, Reporting, and Conformance) Alignment: Ensure your sending domain has an active DMARC policy (minimum
p=nonewith aggregate reporting viarua=mailto:dmarc@yourdomain.com, ideally progressing towardp=quarantineorp=reject). DMARC alignment requires that the domain in the visibleFrom:header matches the domain authenticated by SPF and/or DKIM. - Custom Return-Path (Envelope Sender) Verification: Verify that your
Return-Pathheader uses a custom subdomain on your sending domain (e.g.,bounces.yourdomain.com) rather than a generic ESP domain. Aligning the envelope sender domain ensures strict SPF alignment under DMARC policies.
- Protocol DNS Record Type Pre-Send Verification Step Common Failure Root Cause Details
If you are sending through Sendgrove's email marketing platform, automated domain key verification automatically tests your DNS records before allowing campaign dispatch, catching record alignment errors before they damage your sender score.
Step 2: Audit Subject Line, Preheader, and Sender Name Alignment

Your email envelope—consisting of the From name, subject line, and preheader text—determines whether recipients open your message or ignore it in a crowded inbox. A flaw in these three elements directly depresses open rates and increases spam complaints before anyone sees your body copy.
Envelope Review Protocol
- From Name Clarity & Consistency: Confirm that your
Fromname clearly identifies your brand or a recognized person associated with your company (e.g., "Sarah from Sendgrove" rather than a bare email address or obscure domain). Avoid changing your sender name arbitrarily, as recipients rely on consistent branding for instant inbox recognition. - Reply-To Address Routing Verification: Never send campaigns from an unmonitored
no-reply@address. Ensure theReply-Toheader routes to an active inbox managed by your customer support or sales team. When subscribers reply to your marketing emails, ISPs interpret that engagement as a strong positive signal, boosting your overall domain deliverability. - Subject Line Character Limits & Mobile Truncation: Audit your subject line across desktop and mobile viewports. Keep character counts between 30 and 50 characters so important value propositions are not truncated on smaller mobile screens. Front-load primary keywords and key benefits within the first 25 characters. For specialized subject line frameworks, character limits, and split-testing rules, consult our detailed email subject line checklist.
- Preheader Text (Preview Text) Validation: Ensure your preheader text complements the subject line rather than repeating it word-for-word or displaying default system text like "View this email in your web browser." Aim for 40 to 90 characters of supplementary copy that creates curiosity or reinforces the call to action.
- Whitespace Padding for Short Preheaders: If your preheader copy is under 50 characters, fill the remaining preview space with non-breaking spaces (
and͏) to prevent mobile mail clients from pulling in random HTML text, image alt tags, or navigation link copy from the top of your email body into the inbox preview snippet.
Step 3: Test Personalization Tokens, Merge Tags, and Fallback Values
Dynamic merge tags—such as {{first_name}}, {{company_name}}, or {{account_tier}}—allow you to deliver tailored experiences at scale. However, unpopulated merge fields that render as blank spaces or raw code snippets like Hello {{first_name|default:''}} immediately signal a lack of quality control and hurt brand trust.
Mergetag & Dynamic Content Validation
- Database Attribute Mapping: Double-check that your merge fields reference valid contact properties in your audience list. Confirm that custom attributes created for specific campaigns align with the database field schema.
- Global Fallback Value Standard: Every personalization token must carry a sensible default fallback value. For example, if a contact record lacks a first name,
Hello {{first_name|default:'there'}}gracefully resolves to "Hello there" rather than "Hello " or "Hello Subscriber". - Conditional Content Branching Inspection: If your email uses advanced conditional liquid tags (such as
{% if subscriber.industry == 'SaaS' %}), preview the campaign under multiple test profiles representing each conditional segment to ensure logic branches close properly without rendering empty white blocks or unformatted code tags. - Date and Currency Formatting: Confirm that dynamic date tokens (e.g.,
{{ event_date | date: "%B %d, %Y" }}) and pricing variables render accurately based on subscriber locale and timezone settings.
Step 4: Inspect All Destination Links, UTM Parameters, and Redirects
A single broken link in a high-volume campaign destroys campaign ROI and frustrates interested subscribers. Performing a comprehensive link audit is a mandatory phase of any things to check before sending an email campaign routine.
Comprehensive Link QA Protocol
- Destination URL Verification: Click every hyperlink, CTA button, image link, and footer link in your test send. Confirm that destination pages load over secure HTTPS protocols and return a
200 OKHTTP status code rather than a404 Not Foundor500 Server Error. - UTM Tracking Parameter Standardization: Verify that all marketing links carry standardized Google Analytics UTM parameters (
utm_source,utm_medium,utm_campaign,utm_content). Ensure URL parameters are lowercase, hyphen-separated, and consistently named across email variants so campaign revenue is accurately attributed in web analytics dashboards. - Click Tracking SSL Domain Alignment: If your ESP uses custom click-tracking domains (e.g.,
link.yourdomain.com), verify that your tracking domain has a valid, active SSL certificate. Unencrypted HTTP tracking links trigger security warnings in modern web browsers and mobile mail clients. - Deep Link & Mobile App Redirection: If your campaign links to a mobile app or gated resource, test the URL on actual mobile devices to ensure deep-linking tags resolve smoothly without trapping users in infinite browser redirect loops.
- Primary Call-to-Action Prominence: Check that your primary call-to-action button stands out visually with high-contrast button styling, clear descriptive action verbs, and ample whitespace. To dive deeper into optimizing action buttons for high engagement, review our guide on improving email click-through rates.
Step 5: Execute List Hygiene and Scrub Stale Addresses
Sending a new campaign to an unvalidated audience list is the fastest way to spike hard bounces, trigger spam trap hits, and damage your domain reputation. Pre-campaign audience verification ensures that every recipient address is active, valid, and safe to email.
Audience Pre-Flight Scrubbing Protocol
- Remove Inactive & Dormant Subscribers: Filter out contacts who have not opened or clicked an email in 90 to 180 days. Continuing to blast disengaged contacts signals poor list management to Gmail and Yahoo, pushing future sends into the spam folder. Move dormant contacts into a dedicated win-back workflow or sunset segment.
- Scrub Hard Bounces and Syntax Typos: Verify that your mailing list is free from common domain typos (e.g.,
@gmai.comor@yaho.com) and invalid syntax. Hard bounces occurring above 1% to 2% trigger automated sending pauses across major email service providers. - Suppress Role-Based and Disposable Accounts: Exclude generic addresses like
info@,sales@,admin@, orsupport@along with temporary disposable inbox domains. These addresses rarely belong to individual decision-makers and frequently convert into spam complaint sources. - Identify & Eliminate Spam Traps: Spam traps—comprising pristine traps created by security vendors and recycled dormant accounts repurposed by ISPs—do not bounce; instead, they silently record incoming messages and flag the sending IP for domain blacklisting.
- Automated Pre-Send Validation: Integrate automated list verification prior to campaign dispatch. Using Sendgrove's real-time email validation scrubs toxic spam traps, syntax errors, and invalid mailboxes directly from your contact lists before a single message is transmitted, preserving your sender score.
| List Threat Category | Definition / Mechanism | Pre-Send Scrubbing Action | |---|---|---| | Invalid / typo domains | Misspelled domains (@gmai.com, @yaho.com) and bad syntax | Scrub with real-time validation before dispatch | | Spam traps | Pristine or recycled addresses used by ISPs/security vendors | Suppress aged/unengaged and never-mailed purchased lists | | Role-based addresses | info@, sales@, admin@, shared inboxes | Exclude or route to a low-risk segment | | Disposable inboxes | Temporary mailbox providers | Block at signup and remove before send |
Step 6: Audit Mobile Responsiveness and Dark Mode Rendering
Over 58% of all marketing emails are opened on mobile devices, and over 42% of mobile users read emails in dark mode. An email that looks stunning on a desktop monitor can easily break on an iPhone or Android device if mobile media queries or dark mode styles are omitted.
Mobile & Dark Mode Pre-Flight QA
- Single-Column Mobile Stack: Confirm that multi-column desktop layouts cleanly collapse into a single-column layout on mobile viewports (widths under 480px). Text size should remain legible without horizontal scrolling, with body copy set to at least 16px and titles at 22px+.
- Touch Target Sizing: Ensure all CTA buttons and text links are large enough for thumb taps on touchscreens. Minimum recommended touch button dimensions are 44px by 44px with at least 10px of surrounding padding to prevent accidental mis-clicks.
- Dark Mode Image Transparency: PNG graphics with solid white backgrounds render as stark, ugly blocks when inverted in dark mode. Convert logos, product cutouts, and icons to transparent PNG files, and add thin subtle light borders around dark logos so they remain visible on dark backgrounds.
- CSS Dark Mode Inversion Testing: Modern email clients like Apple Mail and Gmail apply custom color inversion algorithms. Preview your HTML templates across both light and dark mode settings to prevent dark text from vanishing against inverted dark backgrounds.
- Fluid Hybrid HTML Layouts: Build campaign templates using fluid hybrid HTML principles—combining CSS
max-width, percentage widths, and Outlook-specific MSO conditional comments (<!--[if mso]>)—to ensure consistent layout rendering across webmail clients and legacy desktop apps.
Step 7: Verify Plain-Text Alternative and HTML Code Cleanliness
Every multipart HTML email campaign sent across the internet must contain a clean, synchronized plain-text alternative version. Spam filters inspect the ratio between HTML code and plain text, and receiving servers deliver the plain-text payload to low-bandwidth environments, smartwatches, and accessibility screen readers.
HTML and Plain-Text Pre-Send Inspection
- Plain-Text Content Parity: Ensure the plain-text version contains the exact same core message, CTA URLs, and disclaimer text as the HTML version. Do not rely solely on automated ESP plain-text generation without inspecting the final output, as raw HTML tags or unformatted URL strings often leak into the text body.
- HTML Code Validation & Size Caps: Keep overall HTML file sizes under 100 KB. Email clients like Gmail aggressively clip emails exceeding 102 KB, hiding your footer, unsubscribe links, and tracking pixels behind a "[Message clipped] View entire message" link.
- Eliminate Forbidden HTML Elements: Remove inline JavaScript, external CSS stylesheets (
<link rel="stylesheet">),<form>tags, and iframe embeds. These elements are universally flagged by security filters as potential malware vectors. - CSS Inlining: Ensure all CSS styles are converted into inline
style="..."attributes on HTML tags prior to send. Webmail clients like Gmail strip external<style>tags in the document head, destroying non-inlined styling.
Step 8: Confirm Audience Suppression Lists and Segment Logic
Sending an email campaign to the wrong audience segment—or failing to exclude unsubscribed or recently converted contacts—damages brand credibility and generates unnecessary opt-outs. Precise audience suppression is a fundamental component of an email QA pre flight checklist.
Audience Segment & Exclusion Audit
- Inclusion Segment Accuracy: Verify that the inclusion rules for your active list match the campaign objective. For example, if you are promoting an upgrade offer for basic plan subscribers, ensure enterprise tier contacts are excluded from the main send.
- Global & Campaign Suppression Exclusions: Cross-reference your global suppression list to confirm that unsubscribed contacts, hard bounced addresses, and spam complainers are automatically excluded. For specialized techniques on maintaining clean list boundaries, read our guide on email list segmentation strategies.
- Recent Purchaser Suppression: If sending a promotional sales email, exclude contacts who purchased the featured product within the past 7 to 14 days. Mailing promotional discounts to customers who just paid full price creates immediate customer service complaints.
- Frequency Cap Rules: Check whether your marketing platform enforces automated frequency capping (e.g., limiting promotional sends to a maximum of two messages per contact within 7 days). Frequency limits prevent subscriber fatigue during intensive product launches.
Step 9: Validate Image Alt Text, Host URLs, and Aspect Ratios
By default, many major email clients—including Microsoft Outlook, Yahoo, and mobile webmail apps—block images until the recipient clicks "Display images." If your campaign relies heavily on image banners without descriptive alt text, subscribers see blank white boxes instead of your message.
Image Assets QA Checklist
- Descriptive Alt Text on Every Graphic: Add meaningful, contextual alt text to all informative images, product photos, and banner graphics. Avoid vague labels like "image1.jpg" or "banner"; instead, use descriptive text like "Sendgrove Email Validation Dashboard showing zero hard bounces".
- CDN Host URL Security & Stability: Ensure all image files are hosted on a reliable, high-speed Content Delivery Network (CDN) using secure HTTPS URLs. Never link images hosted on local development servers or temporary staging environments.
- Explicit Width and Height Attributes: Declare explicit HTML
widthandheightattributes on<img>tags alongside CSSmax-width: 100%. Specifying dimensions prevents layout jump while images load and preserves visual structure when images are blocked. - Animated GIF File Size Optimization: Keep animated GIF file sizes under 2 MB to ensure smooth mobile loading. Limit animation loops to 3 iterations, and ensure the very first frame contains the main product message, as older versions of Outlook only render the static first frame.
- Retina Display 2x Image Scaling: Upload images at 2x resolution (e.g., upload a 1200px wide image for a 600px email container) while restricting visual display width to 600px in HTML attributes. This ensures sharp graphics on high-DPI retina displays without stretching template boundaries.
Step 10: Verify CAN-SPAM, GDPR, and CASL Footers
Legal compliance is non-negotiable for commercial email marketing. Anti-spam regulations worldwide—including the CAN-SPAM Act in the United States, GDPR in the European Union, and CASL in Canada—mandate clear opt-out mechanisms and physical business address disclosures.
Regulatory Compliance Inspection
- Physical Postal Address Disclosure: Confirm that your email footer displays a valid, physical postal address, P.O. Box, or registered commercial location. Missing physical addresses are an immediate violation of CAN-SPAM regulations.
- One-Click Unsubscribe Mechanism: Ensure your email footer contains a clear, prominent unsubscribe link. Test the link to confirm that it directs subscribers to an intuitive opt-out page or preference center that processes unsubscribe requests immediately without requiring password logins.
- RFC 8058 List-Unsubscribe Header: Verify that your sending infrastructure includes standard
List-UnsubscribeandList-Unsubscribe-Postemail headers. Modern inbox providers use these headers to render native "Unsubscribe" buttons at the top of the email client interface next to the sender name. - Consent Record Documentation: For contacts governed by GDPR or CASL, verify that you hold explicit consent records (including opt-in timestamp, IP address, and sign-up form source). To review how proper list authentication protects your brand reputation, see our complete guide on keeping emails out of spam folders.
- Compliance Act Core Requirement Required Pre-Send Asset Details
Step 11: Conduct Multi-Client Test Sends across Real Inboxes
Never rely on in-browser design previews alone. Variations in rendering engines across Apple Mail, Gmail, Outlook, and Yahoo mean that an email rendering perfectly in Chrome can display scrambled tables or missing padding in Microsoft Outlook.
Pre-Send Testing Execution
- Send Live Test Emails to Internal QA Seed Addresses: Send actual test emails to a dedicated seed list containing addresses across Gmail, Yahoo, Outlook, and Apple Mail. Inspect the messages on both desktop and mobile devices.
- Inspect Inbox Rendering in Microsoft Outlook: Microsoft Outlook uses Word as its rendering engine, which frequently ignores CSS margins, padding, and max-width tags. Confirm that button alignment, table borders, and font stacks render predictably without breaking layout columns.
- Verify Links in Live Environment: Open the test send on a mobile device and click every CTA button. Confirm that tracking links redirect smoothly through your tracking domain to the final destination page.
- Peer Proofreading Review: Have a colleague review the live test send. Fresh eyes catch minor typos, awkward phrasing, or missing preheader text that original authors overlook during design.
Step 12: Monitor Send Velocity, Throttling, and Post-Launch Metrics
The pre-send phase does not end when you click the final "Launch" button. Managing send velocity, monitoring real-time delivery logs, and preparing post-send metrics tracking complete your pre send email testing checklist.
Post-Launch Monitoring Protocol
- Send Velocity & Domain Throttling: For large volume sends (over 50,000 messages), use domain-level sending limits or automated IP throttling to stagger delivery over several hours. Staggering sends prevents sudden volume spikes that trigger ISP rate-limiting.
- Real-Time Bounce Log Triage: Watch your real-time delivery logs during the first 15 to 30 minutes of transmission. If you observe hard bounce rates climbing toward 1% or soft bounce throttling codes (
451 4.7.500), pause campaign delivery immediately to inspect audience lists or IP reputation. - Engagement Window Monitoring: Measure open rates, click-through rates, and unsubscribe counts during the first 4 hours post-launch. Compare early engagement data against historical benchmarks to verify normal campaign performance.
- Checklist: Delivery Metric Target Threshold Warning Flag Immediate Pre-Send Countermeasure
- Note: Details
Step 13: Emergency Campaign Pause and Error Remediation Protocol
Even with a rigorous pre send email checklist, unexpected issues can occasionally emerge after clicking "Launch"—such as a third-party landing page crash, an incorrect promo code, or a sudden tracking domain issue. Having a clear emergency remediation plan minimizes revenue loss and subscriber frustration.
Immediate In-Flight Countermeasures
- Pause Campaign Delivery Instantly: If your campaign is actively transmitting through a staggered queue, hit the "Pause Campaign" button in your ESP dashboard immediately. Halting transmission stops remaining messages from leaving the MTA while you triage the issue.
- Implement Server-Side Link Redirection: If a destination URL in the email contains a typo or leads to a 404 page, do not send an immediate apology email. Instead, update the destination redirect in your web server or custom click-tracking domain settings. Server-side URL mapping routes subscriber clicks to the correct landing page without altering the email copy.
- Assess the Necessity of a Correction Email: Only send a follow-up "Oops!" email if the mistake directly prevents subscribers from taking action—such as an invalid discount code or a wrong event date. Sending unnecessary apology emails increases overall inbox noise and raises unsubscribe rates.
- Triage Deliverability Spikes: If real-time SMTP logs show a spike in soft bounce codes (
451 4.7.500) or ISP throttling, pause the send queue for 1 to 2 hours. Lowering send velocity allows receiver reputation algorithms to reset before resuming delivery.
Step 14: Automated Quality Gate Integration for Marketing Operations
For high-velocity marketing operations teams managing dozens of weekly broadcasts and complex automated workflows, manual pre-flight QA can become a bottleneck. Integrating automated quality gates directly into your email production pipeline enforces standards without slowing down campaign velocity.
Automated Email QA Architecture
- API-Driven Pre-Send List Verification: Configure your marketing platform or CRM webhooks to run recipient lists through Sendgrove's email validation API automatically prior to scheduled dispatch times. Automated API scrubbing filters out newly invalidated addresses and disposable inboxes without manual file exports.
- Continuous Integration HTML Code Linting: Implement automated HTML linters in your template repository to check for forbidden HTML tags, un-inlined CSS, missing image alt attributes, and oversized HTML payloads before templates enter production.
- Automated Webhook Monitoring: Set up webhook alerts that track delivery, bounce, and complaint thresholds during the first 15 minutes of campaign launch. Webhook triggers automatically pause campaign queues if hard bounce rates cross pre-set safety limits.
| Quality | Gate | Stage | |---|---|---| | Template Build HTML linter & CSS inliner check Payload < 100 KB, zero | — | — |
Step 15: Specialized Pre-Flight Guidelines for High-Stakes Campaigns
Different campaign formats carry unique deliverability risks. Applying tailored pre-send rules based on campaign intent ensures maximum performance across promotional, transactional, and lifecycle emails.
High-Volume Promotional Sends (BFCM & Product Launches)
- Stagger campaign dispatch across 4 to 8 hour delivery windows to avoid overloading receiving mail servers and e-commerce web infrastructure.
- Pre-warm dedicated IP addresses at least 14 days prior to peak promotional events to build positive sender history for high-volume spikes.
- Confirm that e-commerce coupon codes and cart automation triggers are fully active in your store backend before campaign launch.
Transactional & Onboarding Automated Sequences
- Ensure welcome emails, password resets, and purchase receipts are sent via dedicated transactional IP pools isolated from promotional marketing sends.
- Verify that transactional email templates avoid aggressive marketing copy or heavy promotional graphics that cause webmail clients to re-categorize messages into the Promotions tab.
- Test trigger speed to confirm that onboarding messages land in subscriber inboxes within 10 seconds of opt-in form submission.
Re-Engagement and List Sunset Workflows
- Isolate inactive contact segments (subscribers with zero engagement for 180+ days) into slow-velocity sending pools.
- Use strict double opt-in verification or explicit preference center choices for re-engagement offers.
- Automatically suppress contacts who fail to engage with final sunset sequence emails, maintaining clean list boundaries across all future sends.
The Master Pre-Send Email Campaign QA Matrix
To streamline your pre-flight campaign review, summarize your quality control workflow using this comprehensive reference matrix before hitting send on any broadcast or automated email.
| Step | Step Focus Area Critical Check Points Sendgrove Tool / Feature ---------------------------------------------------- 1 Sender Authentication Valid SPF, DKIM pass, DMARC alignment Au |
5 Common Pre-Send Traps (And How to Avoid Them)
Even experienced marketers make preventable mistakes when launching high-stakes email campaigns under tight deadlines. Recognizing these common pitfalls helps protect your sender reputation and revenue.
1. Relying Solely on In-Browser ESP Previews
- The Pitfall: Assuming that a campaign template looks perfect in all inboxes because it looks great in your ESP's browser design editor.
- The Solution: Rendering engines in Microsoft Outlook and mobile webmail apps process CSS differently than web browsers. Always send live test emails to real test inboxes across desktop and mobile devices.
2. Forgetting to Update UTM Campaign Names
- The Pitfall: Copying a previous campaign template without updating the
utm_campaigntag, causing new campaign traffic to be misattributed to last month's promotion in Google Analytics. - The Solution: Standardize UTM naming conventions and check every link parameter using a URL parameter inspector before sending.
3. Launching Campaigns to Unvalidated Contact Lists
- The Pitfall: Purchasing a third-party list or mailing a legacy database that has not received an email in over 6 months without prior validation.
- The Solution: Run stale lists through automated list cleaning. Running contact lists through Sendgrove's email validation service removes invalid addresses, spam traps, and toxic domains before dispatch.
4. Overlooking Dark Mode Image Contrast
- The Pitfall: Using dark logos with transparent backgrounds that disappear completely when a mobile dark mode client inverts screen backgrounds to black.
- The Solution: Add a subtle white outline or drop shadow around dark elements in transparent PNG files so they remain visible across both dark and light modes.
5. Sending Without a Plain-Text Version
- The Pitfall: Sending an HTML-only email payload without a corresponding plain-text alternative.
- The Solution: Ensure your ESP generates and synchronizes a clean plain-text version with full text parity and accessible URLs.
ESP-Specific Pre-Send QA Guidelines: Gmail, Yahoo, and Outlook
Navigating deliverability rules across modern inbox providers requires understanding the specific algorithms and compliance enforcement used by major webmail services:
- Google Gmail Pre-Send Compliance: Gmail mandates DKIM or SPF authentication for all senders, and strict DMARC alignment for bulk senders (over 5,000 emails/day). Gmail also strictly enforces its 102 KB HTML clipping limit and monitors subscriber engagement velocity. If early recipient cohorts report high spam complaint rates (above 0.1%), Gmail quickly routes remaining messages to the spam folder.
- Yahoo & AOL (Yahoo Mail) Requirements: Yahoo requires valid SPF, DKIM, and DMARC records, easy one-click unsubscribe headers (
List-Unsubscribe-Post), and spam complaint rates under 0.3%. Pre-send QA for Yahoo sends should verify that theList-Unsubscribeheader is active in every outgoing message header. - Microsoft Outlook & Office 365 Rules: Outlook relies heavily on IP and domain reputation via Smart-Network Data Services (SNDS) and strictly filters emails containing unencrypted HTTP tracking URLs or missing reverse DNS (PTR) hostnames. Ensure all links pass SSL inspection prior to dispatch.
How Sendgrove Simplifies Your Pre-Send QA Workflow
Managing pre-flight campaign QA across multiple disconnected third-party tools creates friction and slows down campaign velocity. Sendgrove simplifies the pre-send process by integrating list hygiene, sender authentication verification, and campaign delivery into a single unified platform.
By combining Sendgrove's email marketing tools with automated real-time verification, you eliminate the risk of sending to invalid mailboxes, prevent hard bounce spikes, and protect your domain reputation on every send.
Whether you are launching a weekly newsletter, a promotional launch, or complex behavioral automation sequences, following a structured pre-send checklist ensures consistent inbox placement, clean reporting, and maximum subscriber engagement.
FAQ
What should you check before sending an email marketing campaign?
Before launching an email campaign, run through a complete pre send email testing checklist: verify domain authentication (SPF, DKIM, DMARC), audit sender name and subject line preview text, validate merge tags and fallback values, test all destination links and UTM parameters, clean your email list using real-time validation, inspect mobile and dark mode rendering, and verify plain-text alternative parity and CAN-SPAM compliance footers.
How do you test email links and tracking parameters before sending?
To test email links and tracking parameters, send a live test email to a designated testing inbox and manually click every hyperlink, image link, and call-to-action button. Confirm each destination URL loads over secure HTTPS with a 200 OK status code. Check that all URLs include standardized lowercase UTM parameters (, , , ) to ensure accurate conversion tracking in Google Analytics.
Why is pre-send email validation critical for deliverability?
Pre-send email validation removes invalid mailboxes, domain typos, disposable addresses, and spam traps from your list before dispatch. Sending campaigns to stale or unverified contact lists causes hard bounce rates to spike above 1–2%, which triggers automated spam filtering, rate throttling, and domain blacklisting across Gmail, Yahoo, and Microsoft inboxes.
How do you verify email rendering in dark mode across mobile devices?
Verify dark mode rendering by opening live test sends on real mobile devices running Apple Mail, Gmail, and Outlook in dark mode. Ensure all logo assets and graphic icons use transparent PNG backgrounds with subtle light borders so they remain clearly visible against inverted black backgrounds. Test CSS styles to ensure dark text does not vanish against dark inverted background containers.
What authentication records must be verified before launching a bulk send?
Before launching a bulk send, verify four key DNS authentication records: SPF () to authorize your sending IP address, DKIM () for cryptographic header signature alignment, DMARC (, , or ) for domain alignment between the visible From header and Return-Path envelope sender, and custom Return-Path DNS subdomains to ensure strict deliverability compliance.
How far in advance should you schedule an email campaign review?
Schedule your pre-send email campaign review at least 24 to 48 hours prior to the planned dispatch time. This buffer allows sufficient time to fix broken URLs, re-validate stale subscriber list segments, adjust conditional merge tag logic, update graphics for dark mode legibility, and resolve any DNS authentication issues without delaying campaign launch.
What is the maximum recommended HTML file size for email templates?
The maximum recommended HTML file size for email templates is 100 KB. Email clients like Gmail aggressively clip messages exceeding 102 KB, hiding the bottom of your email body, footer disclaimer, and unsubscribe link behind a "[Message clipped] View entire message" link. Clipping hurts reader experience and increases spam complaint rates when users cannot easily locate the unsubscribe link.
Should you test every link in your email campaign before sending?
Yes, every link in your email campaign should be clicked and tested prior to sending. A single broken CTA link, broken unsubscribe link, or malformed tracking URL can destroy campaign conversion rates and distort marketing attribution data. Automated URL inspectors and manual pre-flight test sends catch broken redirect chains and expired landing page links before subscribers receive the message.
What are the main deliverability risks if you skip a pre-send checklist?
Skipping an email QA pre flight checklist creates severe deliverability risks, including sudden hard bounce spikes from unvalidated contact lists, spam folder placement caused by unauthenticated SPF/DKIM headers, missing UTM tracking parameters that ruin revenue attribution, and subscriber unsubscribes resulting from malformed merge tags or broken mobile layouts.